RoboSoda Delivery Bot
Build a self-steering robot that delivers drinks on command!
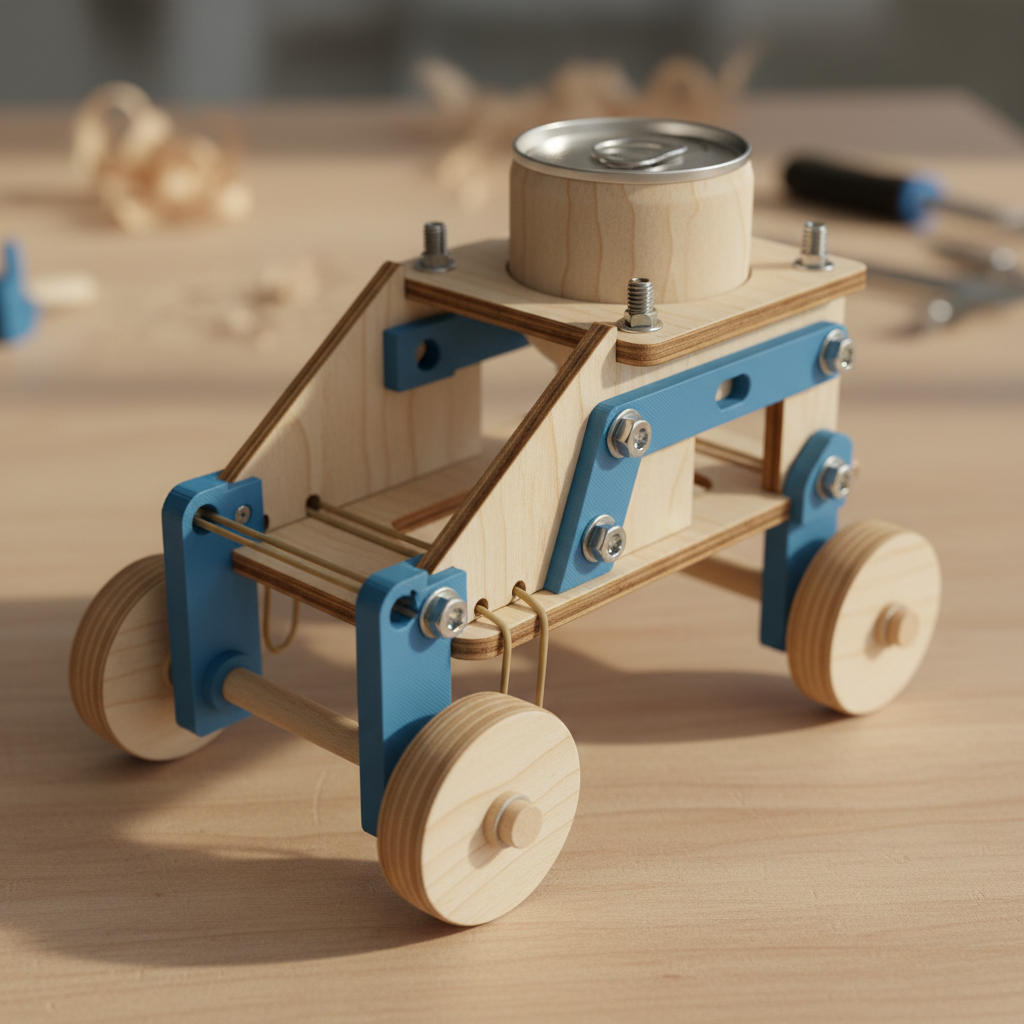
This autonomous delivery vehicle uses rubber band power and a clever steering mechanism to navigate around obstacles and deliver a soda can to its destination. Kids learn about robotics, energy storage, and mechanical steering while building their own delivery bot.
The Builder's Idea
“autonomous soda delivery vehicle”
This kit was designed by AI based on a kid's imagination. Try it with your own idea →
What's in the Kit
Laser-Cut Birchwood
- 1chassis160mm x 100mm
- 1left-side100mm x 3.175mm x 40mm
- 1right-side100mm x 3.175mm x 40mm
- 1front-bumper80mm x 3.175mm x 30mm
- 1steering-wheel50mm x 50mm
3D-Printed PLA Parts
- 1rear-axle-mount-L25mm x 20mm x 20mm
- 1rear-axle-mount-R25mm x 20mm x 20mm
- 1front-axle-mount-L25mm x 20mm x 20mm
- 1front-axle-mount-R25mm x 20mm x 20mm
- 1power-hook-rear15mm x 15mm x 17mm
- 1power-hook-front15mm x 15mm x 17mm
- 1steering-spring-seat-L15mm x 15mm x 13mm
- 1steering-spring-seat-R15mm x 15mm x 13mm
- 1cargo-holder70mm x 70mm x 30mm
- 1steering-linkage40mm x 25mm x 8mm
Hardware
- 12M3x8mm socket head cap screwfor axle mounts and cargo holder
- 6M3x10mm socket head cap screwfor hooks and spring seats
- 18M3 hex nutIncluded
- 18M3 flat washerIncluded
- 34mm birch dowel axle100mm rear axle, 60mm front axles, 40mm steering
- 41.5" birch wheel (38mm)drive wheels
- 2#64 rubber band (3.5" x 1/4")main propulsion power
- 2Small compression spring (5mm OD x 20mm)steering return springs
- 12.5mm Allen key (for M3 screws)Included
Assembly Instructions
- 1
Step 1: Lay out all wooden panels, blue 3D-printed parts, wheels, dowels, screws, nuts, washers, rubber bands, and springs. Check you have everything!
- 2
Step 2: Slide the left and right side panels into the slots on the edges of the chassis base plate. They should fit snugly.
- 3
Step 3: Flip the chassis over. Screw the four axle mounts to the underside - two at the back (20mm from edge) and two at the front using M3x8mm screws, nuts, and washers.
- 4
Step 4: Mount the soda can cargo holder to the center top of the chassis using M3x8mm screws. This will hold your delivery item!
- 5
Step 5: Attach the rubber band power hooks - one at the very back of the chassis and one at the front, using M3x10mm screws.
- 6
Step 6: Install the steering spring seats on the front left and right of the chassis using M3x10mm screws, then place the small compression springs between them.
- 7
Step 7: Insert the 100mm rear axle through the side panel holes and rear axle mounts. Press two wheels onto each end of this axle.
- 8
Step 8: Insert the 60mm front axle through the front side panel holes and axle mounts. Press the remaining two wheels onto this axle.
- 9
Step 9: Connect the steering linkage to the front bumper using an M3x8mm screw, then insert the 40mm steering axle through the linkage.
- 10
Step 10: Press the steering wheel onto the steering axle. When the bumper hits an obstacle, it will turn the front wheels!
- 11
Step 11: Stretch the two heavy rubber bands (#64) between the front and rear power hooks. These provide the driving force.
- 12
Step 12: Load a soda can into the cargo holder. Wind up the rear axle by rolling the bot backward to store energy in the rubber bands.
- 13
Step 13: Place your RoboSoda on the floor, release it, and watch it navigate around obstacles to deliver the soda!
How Parts Connect
About This AI-Designed Building Kit
This RoboSoda Delivery Bot kit was designed entirely by artificial intelligence based on a young inventor's idea. Every InventShack kit features precision laser-cut 1/8" birchwood plywood panels, custom 3D-printed PLA components, and real M3 socket head cap screws with hex nuts — the same hardware used in real engineering projects.
Unlike mass-produced building kits, this design is one-of-a-kind. The AI selected from a library of parametric component templates — base plates, side panels, wheel discs, axle mounts, rubber band hooks, corner brackets, and more — then configured each part's dimensions to create a working build. All holes align to a 10mm grid system, ensuring every part connects properly.
Perfect for kids ages 8-10 who love building, inventing, and engineering. Whether you have a laser cutter, a 3D printer, or just want to see what AI can design — InventShack turns kids' ideas into real, buildable projects.
Want kits shipped to your door?
We're building a service that ships AI-designed kits with all parts included. Sign up to be notified when we launch.
Have your own invention idea?
Tell the AI what you want to build and get a complete kit designed in seconds — laser-cut wood parts, 3D-printed components, and step-by-step assembly instructions.