Robotic Cleanup Arm Kit
Build a desktop robot that helps organize your stuff!
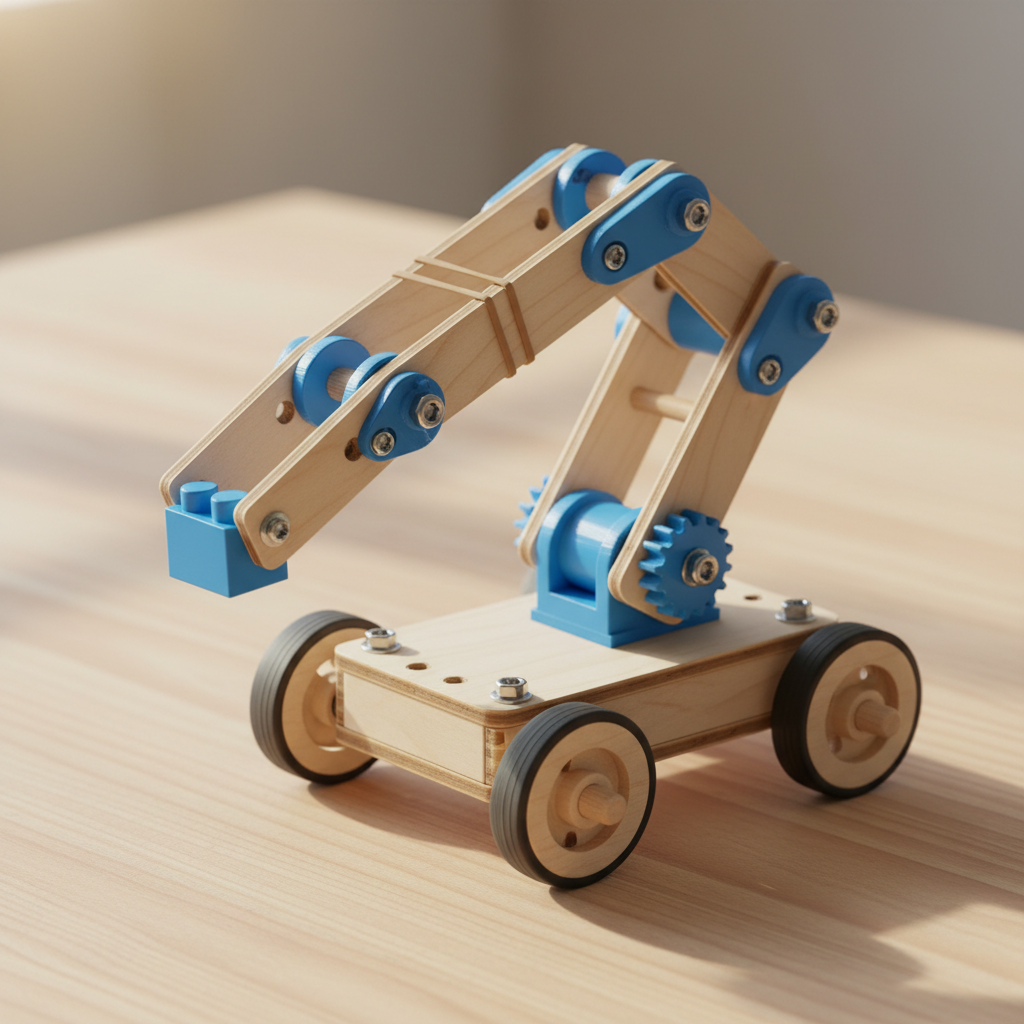
Create your own robotic arm that can pick up and move small objects around your desk or bedroom. Use rubber band power to make the gripper open and close, and manually position the arm to grab toys, pencils, or other lightweight items.
The Builder's Idea
“Bedroom Cleanup Kit with Robotic Arm”
This kit was designed by AI based on a kid's imagination. Try it with your own idea →
What's in the Kit
Laser-Cut Birchwood
- 1base-platform120mm x 120mm
- 1arm-segment-1100mm x 3.175mm x 30mm
- 1arm-segment-280mm x 3.175mm x 30mm
- 1gripper-left40mm x 3.175mm x 20mm
- 1gripper-right40mm x 3.175mm x 20mm
3D-Printed PLA Parts
- 1base-joint-mount25mm x 20mm x 20mm
- 1elbow-joint-mount20mm x 15mm x 15mm
- 1wrist-joint-mount20mm x 15mm x 15mm
- 1gripper-pivot-mount15mm x 12mm x 12mm
- 1gripper-hook-left12mm x 12mm x 10mm
- 1gripper-hook-right12mm x 12mm x 10mm
- 1control-handle30mm x 15mm x 80mm
Hardware
- 12M3x8mm socket head cap screwfor mounting axle mounts to arm segments
- 4M3x6mm socket head cap screwfor gripper hooks
- 16M3 hex nutIncluded
- 16M3 flat washerIncluded
- 44mm birch dowel axle50mm length for joints, 40mm for gripper pivot
- 2#16 rubber band (2.5" x 1/16")for gripper spring action
- 12.5mm Allen key (for M3 screws)Included
Assembly Instructions
- 1
Step 1: Lay out all wooden panels, blue 3D-printed parts, screws, nuts, washers, dowel axles, and rubber bands.
- 2
Step 2: Use the Allen key to screw the large base joint mount to the center of the platform with 4 screws, nuts, and washers.
- 3
Step 3: Attach the elbow joint mount to one end of the first arm segment using 2 screws. This will be the 'shoulder' end.
- 4
Step 4: Attach the wrist joint mount to one end of the second arm segment using 2 screws.
- 5
Step 5: Screw the small gripper pivot mount to the left gripper jaw, and attach the rubber band hooks to both gripper jaws.
- 6
Step 6: Insert the first 50mm axle through the base mount and the shoulder hole of arm segment 1. The arm should rotate freely.
- 7
Step 7: Insert the second 50mm axle through the elbow mount and the shoulder hole of arm segment 2 to connect the two arm segments.
- 8
Step 8: Insert the 40mm axle through the wrist mount and gripper pivot mount to attach the gripper assembly.
- 9
Step 9: Slide the control handle onto the base axle so you can rotate the entire arm by turning the handle.
- 10
Step 10: Stretch one rubber band between the two gripper hooks. The gripper jaws should close together when not held open.
- 11
Step 11: Test your robotic arm! Hold the gripper jaws open, position the arm over a small object like a pencil or toy, then release to grab it.
- 12
Step 12: Practice moving objects around your desk by positioning the arm segments and using the gripper to pick up and release items.
How Parts Connect
About This AI-Designed Building Kit
This Robotic Cleanup Arm Kit kit was designed entirely by artificial intelligence based on a young inventor's idea. Every InventShack kit features precision laser-cut 1/8" birchwood plywood panels, custom 3D-printed PLA components, and real M3 socket head cap screws with hex nuts — the same hardware used in real engineering projects.
Unlike mass-produced building kits, this design is one-of-a-kind. The AI selected from a library of parametric component templates — base plates, side panels, wheel discs, axle mounts, rubber band hooks, corner brackets, and more — then configured each part's dimensions to create a working build. All holes align to a 10mm grid system, ensuring every part connects properly.
Perfect for kids ages 8-10 who love building, inventing, and engineering. Whether you have a laser cutter, a 3D printer, or just want to see what AI can design — InventShack turns kids' ideas into real, buildable projects.
Want kits shipped to your door?
We're building a service that ships AI-designed kits with all parts included. Sign up to be notified when we launch.
Have your own invention idea?
Tell the AI what you want to build and get a complete kit designed in seconds — laser-cut wood parts, 3D-printed components, and step-by-step assembly instructions.